Introduction
Welcome to the first part of our multi-part series on building a Login/Signup form in React Native. In this article, we’ll focus on the setup process and cover the following topics:
- How to integrate TailwindCSS in your React Native app using the Nativewind library
- Styling button components using TailwindCSS classes
- Setting up React Native Navigation and implementing navigation between three pages: Greeting, Login, and Signup.”
You can find the source code on my Github This is how the end result looks like.
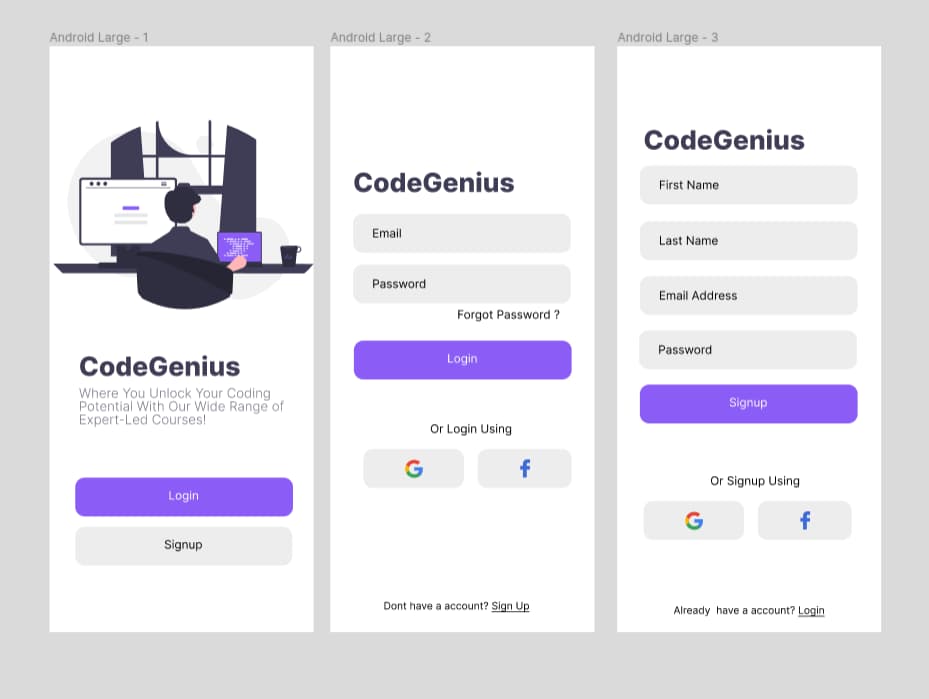
Fig. 1 - Login/Signup Application in react native
Disclaimer: This project is UI-focused, with an emphasis on styling and design. It’s a mobile app, but it’s not connected to any backend or database, so all the data is hard-coded in the pages. The primary goal of this project is to practice coding and explore various design ideas, with the aim of producing a visually appealing and functional mobile app.
Prerequisites
- Nodejs for using react native cli.
- Text Editor / IDE (VS Code, Android Studio).
- Android device or Android Virtual Device for testing.
If this is your first time working with react native, I have made a in-depth guide on setting up development environment for react native on linux.
Setting up Tailwindcss with Nativewind in react native application
- Tailwindcss is a css library used for web, where we style UI using pre-defined in-line css classes. It has very good defaults set out of the box.
- Nativewind allows us to use tailwindcss in react-native. It acts as a compatibility layer between React Native and CSS.
Creating a react native project using react-native cli:
npx react-native init <projectName>Installing node js dependencies for tailwindcss and nativewind according to official Nativewind docs:
npm i nativewind
npm i -D tailwindcss
Generate a tailwind config file using command:
npx tailwindcss initThis will generate a tailwind.config.js in the root directory of your project, simply run the command mentioned. After generating the file, you can edit its content to include the pages directory which we will create later on in the project.
/** @type {import('tailwindcss').Config} */
module.exports = {
  content: ["./App.{js,jsx,ts,tsx}", "./pages/*.{js,jsx,ts,tsx}"],
  theme: {
    extend: {},
  },
  plugins: [],
};
Make the below mentioned changes in babel.config.js:
module.exports = {
  presets: ["module:metro-react-native-babel-preset"],
  plugins: ["nativewind/babel"],
};
Replace all content in App.tsx with following:
import { View, Text } from "react-native";
import React from "react";
import "nativewind/types.d";

const App = () => {
  return (
    <View className="mt-12">
      <Text className="pl-4 text-3xl font-bold">App</Text>
    </View>
  );
};

export default App;
Now run the app:
npm run androidnpx react-native start

Fig. 2 - App.tsx
By applying inline Tailwind CSS classes to our app component, we have successfully styled it. You can now see the visual changes in the app.
Working with React Navigation.
What is React Navigation.
- Web browsers use links to navigate between pages and manage the browser history stack. React Native doesn’t have a built-in history stack.
- React Navigation’s native stack navigator helps transition between screens and manage navigation history in React Native.
- With a single stack navigator, the app can push and pop items from the navigation stack similar to how a web browser manages the history stack.
- The key difference is that React Navigation provides gestures and animations for transitioning between screens on Android and iOS.
Setting up React Navigation in our project.
Installing necessary node js dependencies for React Navigation core utilities:
npm install @react-navigation/native @react-navigation/native-stackWe also need to install react-native-screens and react-native-safe-area-context.
For bare react native project execute the following command:
npm install react-native-screens react-native-safe-area-contextFor expo project execute the following command:
npx expo install react-native-screens react-native-safe-area-contextFor more information in installing dependencies checkout the React native official docs and React Navigation Docs.
Adding three pages for navigation.
To organize our different pages, we’ll create a dedicated folder named pages/ in the root directory. This folder will contain components for pages such as the Greeting, Login, and Signup pages. For now, these components will simply return a single line of text like ‘Greeting’ for the Greeting page and so on. To give you an example, here is what pages/Greeting.tsx looks like:
import { View, Text } from "react-native";
import React from "react";
import { SafeAreaView } from "react-native-safe-area-context";

const Greeting = () => {
  return (
    <SafeAreaView>
      <Text>Greeting</Text>
    </SafeAreaView>
  );
};

export default Greeting;
The SafeAreaView component is used in React Native to ensure that the content of the app is visible on the screen of devices with notches, rounded corners, or other such irregularities. Read more about SafeAreaView.
Follow a similar approach to create the code for the Signup and login pages.
After creating all three pages, now its time to use React Navigation in our main App.tsx so that we can navigate between our all three pages (Greeting page, Signup page and Login page).
import { View, Text } from "react-native";
import React from "react";
import "nativewind/types.d";
import { NavigationContainer } from "@react-navigation/native";
import { createNativeStackNavigator } from "@react-navigation/native-stack";
import Signup from "./components/Signup";
import Login from "./components/Login";
import Greeting from "./components/Greeting";

const Stack = createNativeStackNavigator();

const App = () => {
  return (
    <NavigationContainer>
      <Stack.Navigator>
        <Stack.Screen name="Greeting" component={Greeting} />
        <Stack.Screen name="Signup" component={Signup} />
        <Stack.Screen name="Login" component={Login} />
      </Stack.Navigator>
    </NavigationContainer>
  );
};

export default App;
We wrap all navigators with NavigationContainer component.
-
NavigationContainer is component that is responsible for managing the navigation tree and holds the navigation state.
-
createNativeStackNavigator is a React function that returns an object with two components: Screen and Navigator.
-
Screen will be our individual pages and we will house Navigator with all our individual pages that we want to navigate.
Now in pages/Greeting.tsx we will add Links(buttons) to navigate to other pages ie Login Page and Signup Page.
import { View, Text, TouchableOpacity } from "react-native";
import React from "react";
import { SafeAreaView } from "react-native-safe-area-context";

const Greeting = ({ navigation }) => {
  return (
    <SafeAreaView>
      <Text>Greeting</Text>
      <TouchableOpacity onPress={() => navigation.navigate("Signup")}>
        <Text>Signup</Text>
      </TouchableOpacity>
      <TouchableOpacity onPress={() => navigation.navigate("Login")}>
        <Text>Login</Text>
      </TouchableOpacity>
    </SafeAreaView>
  );
};

export default Greeting;
TouchableOpacityis a component in React Native that provides a touchable area that can be used to detect press gestures. It allows the user to interact with the app by tapping on a particular area of the screen, which can be customized with different styles and effects. When the user taps on the touchable area, the TouchableOpacity component will automatically animate its opacity to give a visual feedback to the user, and then call a function that is defined in its onPress property. The TouchableOpacity component is commonly used for buttons, icons, and other interactive elements in a React Native app.
When the user clicks on the “Signup” button, the app navigates to the Signup page using the navigation.navigate() method. Similarly, the navigation.navigate(“Login”) method is used to navigate to the Login page.
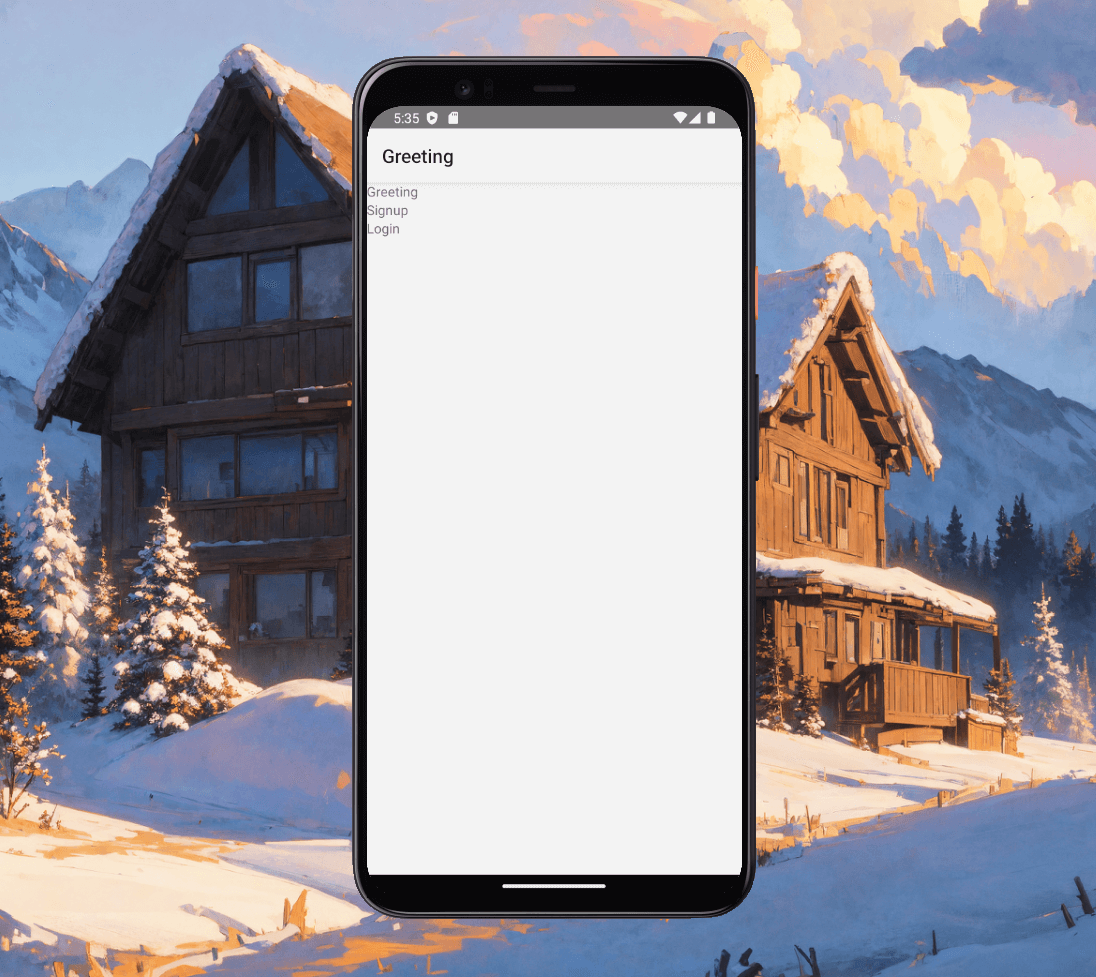
Fig. 3 - Greeting page with Navigation

Fig. 4 - The sign-up page is accessed by clicking on the Signup button located on the Greeting page.
Adding back button
Even though the Navigation header bar in the top of the screen has a back button, we will create our own back button in the Signup and Login pages. This custom button will redirect us back to the Greeting page.
pages/Login.tsx
import { View, Text, TouchableOpacity } from "react-native";
import React from "react";
import { SafeAreaProvider, SafeAreaView } from "react-native-safe-area-context";

const Login = ({ navigation }) => {
  return (
    <SafeAreaView>
      <Text>Login</Text>
      <TouchableOpacity onPress={() => navigation.goBack()}>
        <Text>Back</Text>
      </TouchableOpacity>
    </SafeAreaView>
  );
};

export default Login;-
When the user presses the back button, navigation.goBack() will be called, which will take the user back to the previous screen, i.e., the Greeting page.
-
The Navigator component is organized as a stack where each page is stacked on top of the previous one as we navigate through the app. Using the goBack() method, we can remove the topmost page from the stack and return to the previously active page.
Styling Button using Tailwindcss.
We we style a button using tailwindcss classes.
Use the following code to style both the button ie Signup button and Login button.
<TouchableOpacity
  className="bg-indigo-500 mr-3 mt-2 rounded-md py-2"
  style={{ elevation: 3 }}
  onPress={() => navigation.navigate("Signup")}
>
  <Text className="text-gray-100 text-center text-base">Signup</Text>
</TouchableOpacity>
Customization of Navigation Header Bar
The header bar that provided by default with React Navigation has many customizations like backgroundColor, TintColor and much more.
const App = () => {
  return (
    <NavigationContainer>
      <Stack.Navigator>
        <Stack.Screen
          name="Greeting"
          component={Greeting}
          options={{
            title: "Home",
            headerStyle: {
              backgroundColor: "#6366f1",
            },
            headerTintColor: "#fff",
          }}
        />
      </Stack.Navigator>
    </NavigationContainer>
  );
};
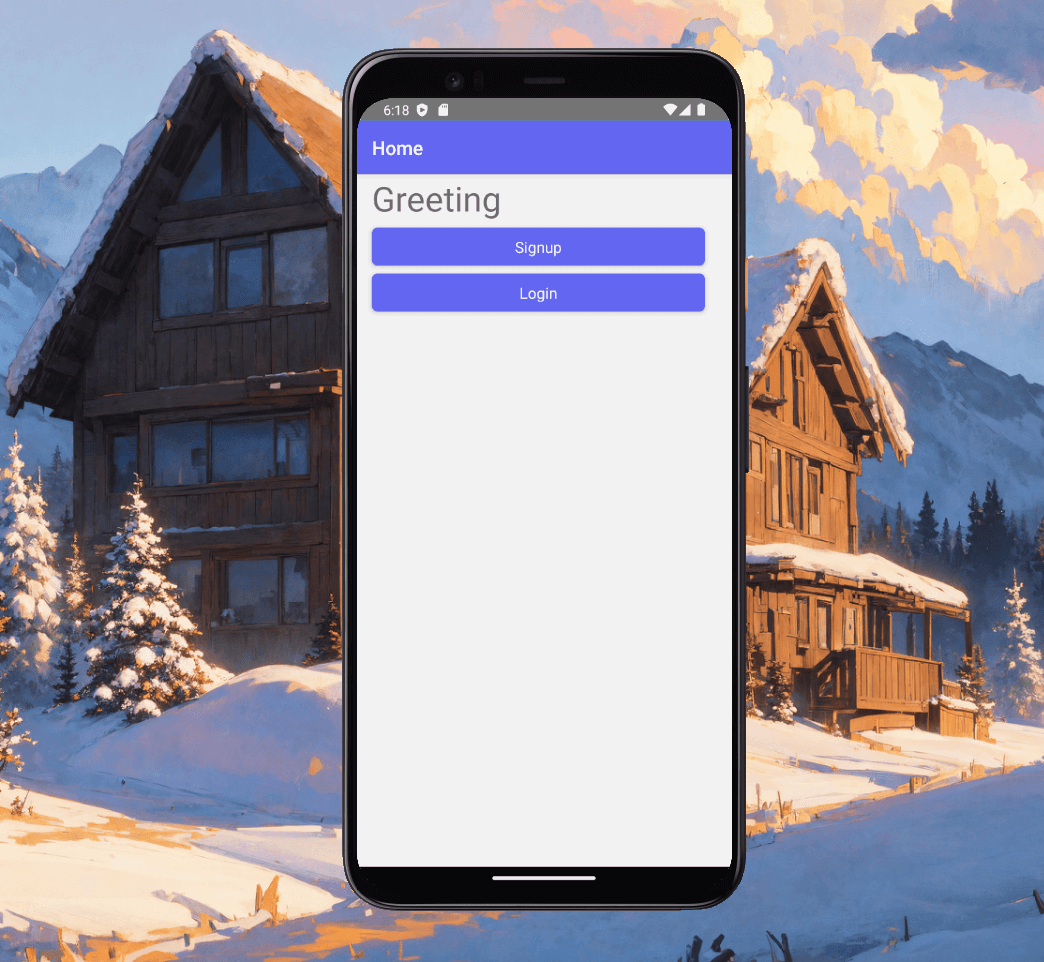
Fig. 5 - Styled buttons and customized Header Bar
Additionally, we can also hide the header of navbar by passing a prop headerShown:false to screen
const App = () => {
  return (
    <NavigationContainer>
      <Stack.Navigator>
        <Stack.Screen
          name="Greeting"
          component={Greeting}
          options={{ headerShown: false }}
        />
      </Stack.Navigator>
    </NavigationContainer>
  );
};
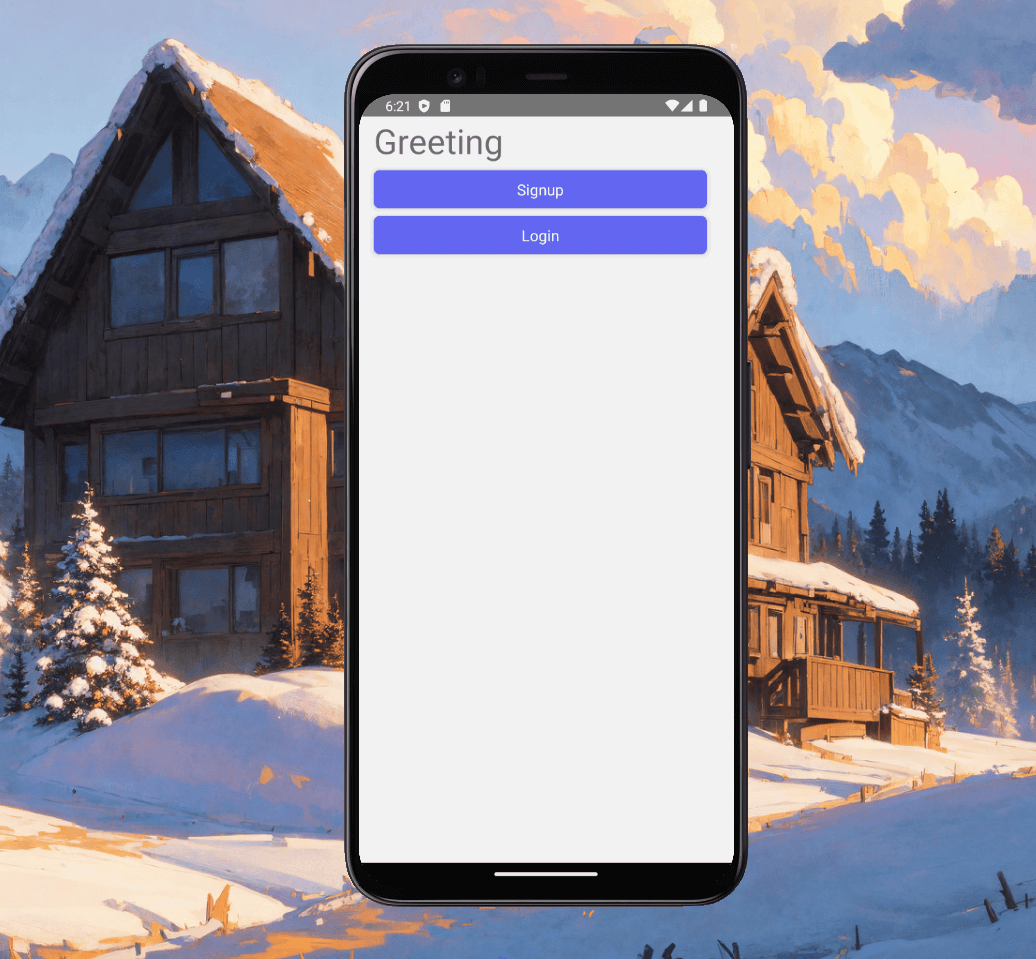
Fig. 6 - Greeting page without header bar
For more customization of header bar checkout the official React Navigation Header docs.
Conclusion
In conclusion, we have successfully set up Tailwindcss in our React Native project using the nativewind library. We have also styled our button component using Tailwindcss classes to achieve a clean and modern look. Furthermore, we have set up React Native Navigation and implemented navigation between three pages: Greeting, Login, and Signup pages. With these tools, we are now well-equipped to create robust and visually appealing mobile applications with easy navigation. It’s important to note that there are many more features and capabilities available with Tailwindcss and React Native Navigation, so be sure to explore and experiment with these tools to make your app stand out. In the next part we will create reusable react components and style our Login/Signup app using tailwindcss.